Fórum témák
- • Elfogadnám, ha ingyen elvihető
- • Felajánlás, azaz ingyen elvihető
- • Nyák nyomtató kérdések
- • Inverteres hegesztőtrafó
- • Rendelés külföldről (eBay - Paypal)
- • Mosogatógép hiba
- • Transzformátor készítés, méretezés
- • Napelemes rendszerek töltésszabályozása
- • Fejhallgató erősítő
- • Alternativ HE találkozó(k)
- • Audio kábel szerelés
- • TV hiba, mi a megoldás?
- • Arduino
- • Erősítő mindig és mindig
- • BiopTron lámpa
- • 135.6 kHz-es HGA22 vevő
- • Li-Po - Li-ion akkumulátor és töltője
- • Videoton RM 5642 S
- • Napelem alkalmazása a lakás energia ellátásában
- • AI szerver házilag - olcsón?
- • Vicces - mókás történetek
- • Feszültségszabályzó motorba
- • V-FET és SIT erősítő kapcsolások
- • Multiméter problémák
- • Szárítógép problémák
- • Kapcsolási rajzot keresek
- • Crystal radio - detektoros rádió
- • Robotfűnyíró vagy fűnyíró robot
- • Érdekességek
- • Villanyszerelés
- • Frekvenciamérő
- • MyElecParts alkatrészkereső és készletnyilvántartó
- • Gigatron TTL számítógép
- • 1.2V NiMH akkumulátor kisütő
- • Számítógép hiba, de mi a probléma?
- • Genius SW-HF5.1
- • Ózon képző 12V AC-ről
- • Klíma beszerelése, fűtés-hűtés házilag
- • Digitális fényképezőgép javítás, egyebek
- • Akkumulátor töltő
- • Kávéfőzőgép hiba
- • Mikrohullámú sütő javítás, magnetron csere, stb.
- • DCF77 óra
- • Atlas TC-2610CU VIDEOTON TV
- • Orsós magnók
- • Kapcsolóüzemű tápegység
- • Műhelyünk felszerelése, szerszámai
- • Autóriasztó és központi zár
- • Villanymotor bekötése
- • RP2040
- • Kapcsolóüzemű táp 230V-ról
- • Multiméter - miért, milyet?
- • Riasztószerelés tapasztalatok, ötletek (kizárólag haladóknak)
- • Hegesztő inverter javítás
- • Forrasztási 1×1 forrasztástechnikai miértek
» Több friss téma
|
A klónok CH340 Soros-USB illesztőjének drivere ( Letöltés)
Teljesen igazad van, a modul csak az aramerosseg atfolyasanak megfelelő feszultseget ad ki, ezt rosszul írtam.
Van olyan megoldás hogy párhuzamosan is lehet több folyamatot futtatni multitask fogalom!
Bővebben: Link
Tiszteletem mindenkinek! Szeretnék Arduino programozásban segítséget kérni. A problémám a következő: A szöveg alatt látható jelenlegi (befejezetlen) kódom. Egy Nextion 7' kijelzővel kommunikál az Arduino Mega 2560. Azt hogy tudnám megcsinálni,ha pl átlép az 5.-ik oldalra akkor azt ne csak 1x hajtsa végre, hanem többször? Pl:
Így megy most:
1, Vár oldal számra az Arduino.
2, 5-ös oldalra ugrott a HMI.
3, Arduino megkapta,hogy 5-ös oldalon van és 1x végrehajtja a hozzátartozó utasítást.
4, Vár oldal számra az Arduino.
.
.
.
Ahogy én szeretném:
1,Megnézi hogy hányadik oldalon van a HMI. (Ha nem tud értéket olvasni,akkor a "jelenlegi oldal" változóban maradt értéket vegye figyelembe)
2,Végrehajtja 1x a hozzátartozó utasítást.
3,Megnézi hogy hányadik oldalon van a HMI. (Ha nem tud értéket olvasni,akkor a "jelenlegi oldal" változóban maradt értéket vegye figyelembe)
4,Végrehajtja 1x a hozzátartozó utasítást.
.
.
.
(végtelen ciklus)
#include <Nextion.h> // Variable init int CurrentPage = 0; // Create a variable to store which page is currently loaded // Variable init end //Page 2 start (MAIN) NexProgressBar fuel = NexProgressBar(2, 33, "fuel"); //Fuel level NexButton b20 = NexButton(2, 28, "b1"); //Menu button NexNumber n20 = NexNumber(2, 35, "n4"); //Voltage (higher value) NexNumber n21 = NexNumber(2, 36, "n5"); //Voltage (lower value) NexNumber n22 = NexNumber(2, 32, "n0"); //Speedometer NexNumber n23 = NexNumber(2, 10, "n1"); //Tachometer NexButton bb21 = NexButton(2, 31, "b0"); //Logout button NexProgressBar temp = NexProgressBar(2, 14, "temp"); //Temp level //Page 2 end //Page 4 start (LIMITER) NexNumber n40 = NexNumber(4, 3, "n0"); //Speed limit number NexNumber n41 = NexNumber(4, 4, "n1"); //Revolution limit number NexNumber n42 = NexNumber(4, 10, "n2"); //Launch control number //Page 4 end //Page 5 start (GPIO CHECK 1) NexText t50 = NexText(5, 2, "t0"); //Arduino input check NexText t51 = NexText(5, 3, "n1"); //Arduino output check //Page 5 end //Page 6 start (GPIO CHECK 2) NexButton b60 = NexButton(6, 2, "b1"); //Back button NexButton b61 = NexButton(6, 106, "b2"); //Next button NexText t60 = NexText(6, 3, "t0"); //Input 1 (Valami) //FOLYTATNI KELL!!!! //Page 6 end //Page 7 start (ERROR) //Page 7 end // Declare pages: NexPage page0 = NexPage(0, 0, "Welcome"); // Page added as a touch event NexPage page1 = NexPage(1, 0, "Login"); // Page added as a touch event NexPage page2 = NexPage(2, 0, "Main"); // Page added as a touch event NexPage page3 = NexPage(3, 0, "Menu"); // Page added as a touch event NexPage page4 = NexPage(4, 0, "Limiter"); // Page added as a touch event NexPage page5 = NexPage(5, 0, "GPIO Check 1"); // Page added as a touch event NexPage page6 = NexPage(6, 0, "GPIO Check 2"); // Page added as a touch event NexPage page7 = NexPage(7, 0, "Error"); // Page added as a touch event NexPage page8 = NexPage(8, 0, "Emergency_page"); // Page added as a touch event // End of declaring objects char buffer[100] = {0}; // This is needed only if you are going to receive a text from the display. You can remove it otherwise. // Further on this sketch I do receive text so that's why I created this buffer. //Variable define NexTouch *nex_listen_list[] = { &page0, // Page added as a touch event &page1, // Page added as a touch event &page2, // Page added as a touch event &page3, // Page added as a touch event &page4, // Page added as a touch event &page5, // Page added as a touch event &page6, // Page added as a touch event &page7, // Page added as a touch event &page8, // Page added as a touch event NULL // String terminated }; //Variable define END // Page change event: void page0PushCallback(void *ptr) // If page 0 is loaded on the display, the following is going to execute: { CurrentPage = 0; // Set variable as 0 so from now on arduino knows page 0 is loaded on the display } // End of press event // Page change event: void page1PushCallback(void *ptr) // If page 1 is loaded on the display, the following is going to execute: { CurrentPage = 1; // Set variable as 1 so from now on arduino knows page 1 is loaded on the display } // End of press event // Page change event: void page2PushCallback(void *ptr) // If page 2 is loaded on the display, the following is going to execute: { CurrentPage = 2; // Set variable as 2 so from now on arduino knows page 2 is loaded on the display } // End of press event // Page change event: void page3PushCallback(void *ptr) // If page 3 is loaded on the display, the following is going to execute: { CurrentPage = 3; // Set variable as 3 so from now on arduino knows page 3 is loaded on the display } // End of press event // Page change event: void page4PushCallback(void *ptr) // If page 4 is loaded on the display, the following is going to execute: { CurrentPage = 4; // Set variable as 4 so from now on arduino knows page 4 is loaded on the display } // End of press event // Page change event: void page5PushCallback(void *ptr) // If page 5 is loaded on the display, the following is going to execute: { CurrentPage = 5; // Set variable as 5 so from now on arduino knows page 5 is loaded on the display } // End of press event // Page change event: void page6PushCallback(void *ptr) // If page 6 is loaded on the display, the following is going to execute: { CurrentPage = 6; // Set variable as 6 so from now on arduino knows page 6 is loaded on the display } // End of press event // Page change event: void page7PushCallback(void *ptr) // If page 7 is loaded on the display, the following is going to execute: { CurrentPage = 7; // Set variable as 7 so from now on arduino knows page 7 is loaded on the display } // End of press event // Page change event: void page8PushCallback(void *ptr) // If page 8 is loaded on the display, the following is going to execute: { CurrentPage = 8; // Set variable as 8 so from now on arduino knows page 8 is loaded on the display } // End of press event ////////////////////////// End of touch events void setup() { // Put your setup code here, to run once: Serial.begin(9600); // Start serial comunication at baud=9600 // I am going to change the Serial baud to a faster rate. delay(500); // This dalay is just in case the nextion display didn't start yet, to be sure it will receive the following command. Serial.print("baud=115200"); // Set new baud rate of nextion to 115200, but it's temporal. Next time nextion is power on, // it will retore to default baud of 9600. // To take effect, make sure to reboot the arduino (reseting arduino is not enough). // If you want to change the default baud, send the command as "bauds=115200", instead of "baud=115200". // If you change the default baud, everytime the nextion is power ON is going to have that baud rate, and // would not be necessery to set the baud on the setup anymore. Serial.write(0xff); // We always have to send this three lines after each command sent to nextion. Serial.write(0xff); Serial.write(0xff); Serial.end(); // End the serial comunication of baud=9600 Serial.begin(115200); // Start serial comunication at baud=115200 //Sending page ID page0.attachPush(page0PushCallback); // Page press event page1.attachPush(page1PushCallback); // Page press event page2.attachPush(page2PushCallback); // Page press event page3.attachPush(page3PushCallback); // Page press event page4.attachPush(page4PushCallback); // Page press event page5.attachPush(page5PushCallback); // Page press event page6.attachPush(page6PushCallback); // Page press event page7.attachPush(page7PushCallback); // Page press event page8.attachPush(page8PushCallback); // Page press event //Sending page ID END } // End of setup void loop() // Put your main code here, to run repeatedly: { if(CurrentPage == 5) // If the display is on page 5, do the following: { Serial.print("t0.pco="); // Input colour Serial.print(2016); // Green code Serial.write(0xff); // We always have to send this three lines after each command sent to the nextion display. Serial.write(0xff); Serial.write(0xff); Serial.print("t1.pco="); // Input colour Serial.print(2016); // Green code Serial.write(0xff); // We always have to send this three lines after each command sent to the nextion display. Serial.write(0xff); Serial.write(0xff); delay(200); //For bugfix } nexLoop(nex_listen_list); // Check for any touch event } // End of loop
Válaszokat köszönöm! A hozzászólás módosítva: Jún 21, 2019
A diódát hova kell kötni?
Próbáld meg így:
#include <Nextion.h> // Variable init int CurrentPage = 0, OldPage; // Create a variable to store which page is currently loaded // Variable init end //Page 2 start (MAIN) NexProgressBar fuel = NexProgressBar(2, 33, "fuel"); //Fuel level NexButton b20 = NexButton(2, 28, "b1"); //Menu button NexNumber n20 = NexNumber(2, 35, "n4"); //Voltage (higher value) NexNumber n21 = NexNumber(2, 36, "n5"); //Voltage (lower value) NexNumber n22 = NexNumber(2, 32, "n0"); //Speedometer NexNumber n23 = NexNumber(2, 10, "n1"); //Tachometer NexButton bb21 = NexButton(2, 31, "b0"); //Logout button NexProgressBar temp = NexProgressBar(2, 14, "temp"); //Temp level //Page 2 end //Page 4 start (LIMITER) NexNumber n40 = NexNumber(4, 3, "n0"); //Speed limit number NexNumber n41 = NexNumber(4, 4, "n1"); //Revolution limit number NexNumber n42 = NexNumber(4, 10, "n2"); //Launch control number //Page 4 end //Page 5 start (GPIO CHECK 1) NexText t50 = NexText(5, 2, "t0"); //Arduino input check NexText t51 = NexText(5, 3, "n1"); //Arduino output check //Page 5 end //Page 6 start (GPIO CHECK 2) NexButton b60 = NexButton(6, 2, "b1"); //Back button NexButton b61 = NexButton(6, 106, "b2"); //Next button NexText t60 = NexText(6, 3, "t0"); //Input 1 (Valami) //FOLYTATNI KELL!!!! //Page 6 end //Page 7 start (ERROR) //Page 7 end // Declare pages: NexPage page0 = NexPage(0, 0, "Welcome"); // Page added as a touch event NexPage page1 = NexPage(1, 0, "Login"); // Page added as a touch event NexPage page2 = NexPage(2, 0, "Main"); // Page added as a touch event NexPage page3 = NexPage(3, 0, "Menu"); // Page added as a touch event NexPage page4 = NexPage(4, 0, "Limiter"); // Page added as a touch event NexPage page5 = NexPage(5, 0, "GPIO Check 1"); // Page added as a touch event NexPage page6 = NexPage(6, 0, "GPIO Check 2"); // Page added as a touch event NexPage page7 = NexPage(7, 0, "Error"); // Page added as a touch event NexPage page8 = NexPage(8, 0, "Emergency_page"); // Page added as a touch event // End of declaring objects char buffer[100] = {0}; // This is needed only if you are going to receive a text from the display. You can remove it otherwise. // Further on this sketch I do receive text so that's why I created this buffer. //Variable define NexTouch *nex_listen_list[] = { &page0, // Page added as a touch event &page1, // Page added as a touch event &page2, // Page added as a touch event &page3, // Page added as a touch event &page4, // Page added as a touch event &page5, // Page added as a touch event &page6, // Page added as a touch event &page7, // Page added as a touch event &page8, // Page added as a touch event NULL // String terminated }; //Variable define END // Page change event: void page0PushCallback(void *ptr) // If page 0 is loaded on the display, the following is going to execute: { CurrentPage = 0; // Set variable as 0 so from now on arduino knows page 0 is loaded on the display } // End of press event // Page change event: void page1PushCallback(void *ptr) // If page 1 is loaded on the display, the following is going to execute: { CurrentPage = 1; // Set variable as 1 so from now on arduino knows page 1 is loaded on the display } // End of press event // Page change event: void page2PushCallback(void *ptr) // If page 2 is loaded on the display, the following is going to execute: { CurrentPage = 2; // Set variable as 2 so from now on arduino knows page 2 is loaded on the display } // End of press event // Page change event: void page3PushCallback(void *ptr) // If page 3 is loaded on the display, the following is going to execute: { CurrentPage = 3; // Set variable as 3 so from now on arduino knows page 3 is loaded on the display } // End of press event // Page change event: void page4PushCallback(void *ptr) // If page 4 is loaded on the display, the following is going to execute: { CurrentPage = 4; // Set variable as 4 so from now on arduino knows page 4 is loaded on the display } // End of press event // Page change event: void page5PushCallback(void *ptr) // If page 5 is loaded on the display, the following is going to execute: { CurrentPage = 5; // Set variable as 5 so from now on arduino knows page 5 is loaded on the display } // End of press event // Page change event: void page6PushCallback(void *ptr) // If page 6 is loaded on the display, the following is going to execute: { CurrentPage = 6; // Set variable as 6 so from now on arduino knows page 6 is loaded on the display } // End of press event // Page change event: void page7PushCallback(void *ptr) // If page 7 is loaded on the display, the following is going to execute: { CurrentPage = 7; // Set variable as 7 so from now on arduino knows page 7 is loaded on the display } // End of press event // Page change event: void page8PushCallback(void *ptr) // If page 8 is loaded on the display, the following is going to execute: { CurrentPage = 8; // Set variable as 8 so from now on arduino knows page 8 is loaded on the display } // End of press event ////////////////////////// End of touch events void setup() { // Put your setup code here, to run once: Serial.begin(9600); // Start serial comunication at baud=9600 // I am going to change the Serial baud to a faster rate. delay(500); // This dalay is just in case the nextion display didn't start yet, to be sure it will receive the following command. Serial.print("baud=115200"); // Set new baud rate of nextion to 115200, but it's temporal. Next time nextion is power on, // it will retore to default baud of 9600. // To take effect, make sure to reboot the arduino (reseting arduino is not enough). // If you want to change the default baud, send the command as "bauds=115200", instead of "baud=115200". // If you change the default baud, everytime the nextion is power ON is going to have that baud rate, and // would not be necessery to set the baud on the setup anymore. Serial.write(0xff); // We always have to send this three lines after each command sent to nextion. Serial.write(0xff); Serial.write(0xff); Serial.end(); // End the serial comunication of baud=9600 Serial.begin(115200); // Start serial comunication at baud=115200 //Sending page ID page0.attachPush(page0PushCallback); // Page press event page1.attachPush(page1PushCallback); // Page press event page2.attachPush(page2PushCallback); // Page press event page3.attachPush(page3PushCallback); // Page press event page4.attachPush(page4PushCallback); // Page press event page5.attachPush(page5PushCallback); // Page press event page6.attachPush(page6PushCallback); // Page press event page7.attachPush(page7PushCallback); // Page press event page8.attachPush(page8PushCallback); // Page press event //Sending page ID END OldPage = 0; } // End of setup void loop() // Put your main code here, to run repeatedly: { // Ha ez így egyben nem működne? Akkor szétbontod 2 if műveletre! if(CurrentPage == 1 || (CurrentPage == 0 && OldPage == 1)) // If the display is on page 5, do the following: { if(CurrentPage > 0) OldPage = CurrentPage; // Így mindig emlékszik a régi oldalszámra CurrentPage = 0; // Töröljük a megszakítások által beállítót értéket Serial.print("t0.pco="); // Input colour Serial.print(2016); // Green code Serial.write(0xff); // We always have to send this three lines after each command sent to the nextion display. Serial.write(0xff); Serial.write(0xff); Serial.print("t1.pco="); // Input colour Serial.print(2016); // Green code Serial.write(0xff); // We always have to send this three lines after each command sent to the nextion display. Serial.write(0xff); Serial.write(0xff); delay(200); //For bugfix } if(CurrentPage == 5 || (CurrentPage == 0 && OldPage == 5)) // If the display is on page 5, do the following: { if(CurrentPage > 0) OldPage = CurrentPage; CurrentPage = 0; Serial.print("t0.pco="); // Input colour Serial.print(2016); // Green code Serial.write(0xff); // We always have to send this three lines after each command sent to the nextion display. Serial.write(0xff); Serial.write(0xff); Serial.print("t1.pco="); // Input colour Serial.print(2016); // Green code Serial.write(0xff); // We always have to send this three lines after each command sent to the nextion display. Serial.write(0xff); Serial.write(0xff); delay(200); //For bugfix } // nexLoop(nex_listen_list); // Check for any touch event } // End of loop
Biztos látod, hogy a if feltétel vizsgálatokat bővítettem.
(Bár nekem ez nem akar lefordulni. Valószínűleg valami más Nextion könyvtárat használsz) A hozzászólás módosítva: Jún 21, 2019
Kedves kapu48! Köszönöm válaszod!
Ha jól értelmezem a kódod, a CurrentPage változót törlöd és egy temp változóba be raktad az előző oldal értékét?
Igen. Mert már lekezeltük a gombnyomást, de nem tudjuk, mikor törli magától a rutin:
// Page change event: void page0PushCallback(void *ptr) // If page 0 is loaded on the display, the following is going to execute: { CurrentPage = 0; // Set variable as 0 so from now on arduino knows page 0 is loaded on the display } // End of press event
Már ha nincsen 0-ás Paged is? A hozzászólás módosítva: Jún 21, 2019
Ezt a mondatodat nem tudtam értelmezni?:
Idézet:
„Megnézi, hogy hányadik oldalon van a HMI. (Ha nem tud értéket olvasni???)”
Szerintem a régi érték ottmarad a CurrentPage változóban, mivel sehol nem látom törölni azt.
Ezért mi is a probléma?
Van olyan rész,amikor a kijelző automatikusan vált oldalt,anélkül hogy az Arduino-t megkérné rá.
A nem tud értéket olvasni részre pedig azt értem,mikor bekapcsoljuk (egyszerre) a kijelzőt és az Arduino Megát,a megának több bekapcsolási idő kell,mint a kijelzőnek. Addig a kijelző már váltott is oldalt. Ez valamiért így van.
Problémának nem probléma. Mindössze annyit szeretnék csak,ha lap váltás van,akkor a laphoz tartozó ciklust ne csak 1x hajtsa végre,hanem egészen addig csinálja,míg a HMI nem vált oldalt. Természetesen ha másik oldalra lép,akkor annak az utasítását (ami még nincs megírva) hajtsa végre végtelen ciklusban,egészen lapváltásig és így tovább.
Közben megtaláltam a hibát! A program végtelen ciklusban csinálja az oldalhoz fűződő feladatát. Az elején volt egy kis kommunikációs hibám és ez okozta néha a fennakadást. Köszönöm a segítséget!
Üdvözlet mindenkinek! Egy másik témával kapcsolatban érdeklődnék. Input digital/analog pin-re maximum mekkora feszültséget kapcsolhatok Mega 2560 mini pro esetén? Neten valamiért azt nem találom.
Válaszokat köszönöm!
Megnézed a uC adatlapját abból biztos kiderül ... 
Amúgy max a tápfeszt kötheted többet nem illik.
Absolute Maximum Ratings*
Voltage on any Pin except RESETwith respect to Ground -0.5V to VCC+0.5V
Voltage on RESET with respect to Ground......-0.5V to +13.0V
Maximum Operating Voltage ............................................ 6.0V
DC Current per I/O Pin ................................................ 40.0mA
DC Current VCC and GND Pins ................................. 200.0mA
*NOTICE:Stresses beyond those listed under “Absolute Maximum Ratings” may cause permanent dam-age to the device. This is a stress rating only and functional operation of the device at these or other conditions beyond those indicated in the operational sections of this specification is not implied. Exposure to absolute maximum rating conditions for extended periods may affect device reliability A hozzászólás módosítva: Jún 22, 2019
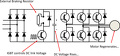
A fűtőszállal párhuzamosan. A fet kikapcsolásakor a fűtőszál és a bekötő huzalok induktivitása miatt jelentős túlfeszültség keletkezhet. Ez tönkre teheti a fetet, ezért a panelon, a fet mellé kell betenni ezt a szabadon futó diódát (és persze a közelben kell lennie a kondenzátornak is, ami megfogja a diódát). Úgy, mint a motorvezérlőknél szokás. Itt is egy ilyen kapcsolás van, ahol a fetet egy szabadon futó dióda védi és ott van egy 470µF-os kondenzátor is. A hozzászólás módosítva: Jún 22, 2019
Szerintem egy rezisztív típusú terhelésnél felesleges a dióda. Ott kikapcsoláskor nem lesz szinte semmi feszültség ugrás. Te is írtad, hogy a diódát be lehet rakni, mint a motorvezérlőknél is bent van. A motor induktív terhelés, a fűtőszál rezisztív. A bekötő vezeték induktivitása elhanyagloható. Persze ártani nem árt a dióda, csak felesleges. A hozzászólás módosítva: Jún 22, 2019
Sziasztok!
Arduino UNO-t, hogyan tudom elérni visual basic programból? A serial monitort szokták használni?
Én Visual Studioban próbálkozok vele, ott összetevőként hozzá lehet adni az arduinot. Kell neki az uno mert azon futtatja debugban. Van bent soros monitor.
Nem tudni, milyen hosszú vezetékkel köti be, de néhányszor 10uH könnyen összejön egy fűtőszál bekötésekor (mérd meg egy 1m hosszú sima vezeték induktivitását), ami meg egyáltalán nem elhanyagolható. Ha a fet 100nsec gyorsan kapcsolja ki a 3A-es áramot, akkor U=-L*(di/dt)= -10-5*(3/10-7)= -300V-os túlfeszültség keletkezik. Nem véletlen, hogy a frekvenciaváltók fék-chopperében is ott van a szabadonfutó dióda, pedig ott általában IGBT kapcsol valamivel lassabban, és sokkal induktivitás szegényebb szerelés érhető el az ellenállás bekötésénél.
Frekvencia váltóra általában mit kötnek? Motort? 
A legtöbb frekvenciaváltóban van fékchopper, ahová egy ellenállást kötnek. Ott is van szabadon futó dióda.
2560 van 3.3v és 5v I/O is ezekre majd figyelj (logic sniffer)!
Látom a kapcsolási rajzon. A fékező ellenállás az mire van kötve, tehát mit fékez? A kapcsolási rajzon ha jól látom, bal oldalon a betáp van, három fázis, utána az IGBT-k, amik a motor tekercseit kapcsolják. A fékező ellenállásnak nem a motor tekercsét kellene az ellenállásra kapcsolnia? Így a motor által termelt feszültség az ellenálláson hővé alakul. A kapcsolási rajz alapján mást látok.
A frekvenciaváltó amikor fékezi a motort, az energiát visszatáplálja a közbenső DC körbe. Ez az energia elkezdi emelni a DC körben lévő kondenzátorokon a feszültséget. Hogy ez ne okozzon bajt, a fék-chopper bekapcsolja a fékellenállást, hogy azon fűtse el a visszatáplált energiát. Nyilván csak addig van bekapcsolva, amíg vissza nem csökkentette a feszültséget a biztonságos tartományba.
Az aszinkron motort nem lehet csak ellenállással fékezni, mint mondjuk a DC motorokat, mert ha leválasztod a hálózatról, néhány periódus alatt legerjed, és hiába teszel rá ellenállást, nem fog rajta áram folyni. Az aszinkron motorokat a fentebb vázolt generátoros fékezésen kívül DC árammal illetve a csúszógyűrűs motoroknál ellenáramúlag lehet még fékezni tudtommal.
Egyébként ha 100ns-mal kapcsolsz PWM-et, az 10MHz-et jelent! Ennyivel biztosan nem fogsz egy Arduino-val fűtőszálat kapcsolni. Inkább csak 100Hz-3KHz közöttivel.
Ne haragudj, de kábel induktivitásra is más nagyságrendben találtam utalást. Bővebben: Link
Idézek: "Tájékoztató adatok: a szimmetrikus kábelek induktivitása kb. 0,7 mH/km, a koaxiális kábeleké pedig kb. 0,25 mH/km nagyságrendű."
Te néhányszor 10uH-t írsz, kb. 1m kábelre. 10uH pedig 10 000nH-vel egyenlő.
Valami nagyon-nagyon nem stimmel a számításoddal, plusz az egyenleteddel sem, szerintem. A hozzászólás módosítva: Jún 23, 2019
Az analóg mérést általában úgy kezdjük, hogy beállítunk valamilyen referencia feszültséget.
Ez lehet belső referencia (Kevesebb a gond vele, de pontatlanabb), vagy külső HW-val megvalósítani
(több odafigyelést igényel, cserébe jobb eredményt lehet elérni).
Szóval, ha ez a feszültség már megvan, akkor tudod, hogy ez lesz a felső határ, amin nem szabad feljebb meni!
A pwm vivője lehet 100Hz-3kHz. De kapcsoláskor szeretnénk minél gyorsabban kapcsolni a kapcsolási veszteségek mérséklése érdekében (én írtam is, hogy milyen meghajtást ajánlok). Ha megnézed a fetmeghajtók adatlapját, láthatod, hogy a 100nsec-es kapcsolás átlagosnak mondható a fetek esetébe. És bizony kapcsoláskor ahogy írod, 10MHz-es tranziens jelek keletkeznek, ami miatt pl.: a kapcsoló üzemű tápegységre RF szűrőt kell rakni.
Ha a kábelek induktivitása 0,7mH/km =700uH/km =0,7uH/m =700nH/m. A kábelek erei azonban szorosan egymás mellett vannak, ezért ott kedvezőbb a helyzet, mintha egyeres vezetékkel kötsz be valamit (az induktivitás növekszik, ha a vezetők által közrezárt terület növekszik). A fűtőszál bekötését ilyennek feltételeztem.
A kedvedért elővettem egy kb. 1m-es vezetéket, és megmértem az induktivitását, ha hurokban lerakom az asztalra. Kb. 2uH-t mértem. De legyen a bekötés csak 3uH-is, akkor is 100V-os túlfeszültség keletkezik.
0,7 mH/km = 0,7 uH/m, és ha a fűtőszálban fel van tekerve mondjuk 30 m 0,7 uH/m induktivitású huzal, akkor már simán a "néhányszor 10uH" nagyságrendben vagyunk.
A nH-t nem tudom miért keverted ide.
|
|